Since I started migrating most of the services I run from various TrueNAS jails/VMs to the Proxmox instance, I have also set up a WireGuard® server since I find it way easier to set up than OpenVPN for example, and my router’s implementation of WireGuard® is not the finest at this moment.
Some earlier benchmarks that I’ve done on my home network, using two identical jails, one for
OpenVPN and the other for WireGuard®, the WireGuard® instance could serve at least twice the
bandwidth (tested using iperf from another external 1Gbit connection) while using less resources
(relatively), and the peering was a bit better. However, your mileage may vary depending on the
hardware, software, etc.
Note: this post uses a QEMU based VM, however any kind of FreeBSD install works, including vnet jails.
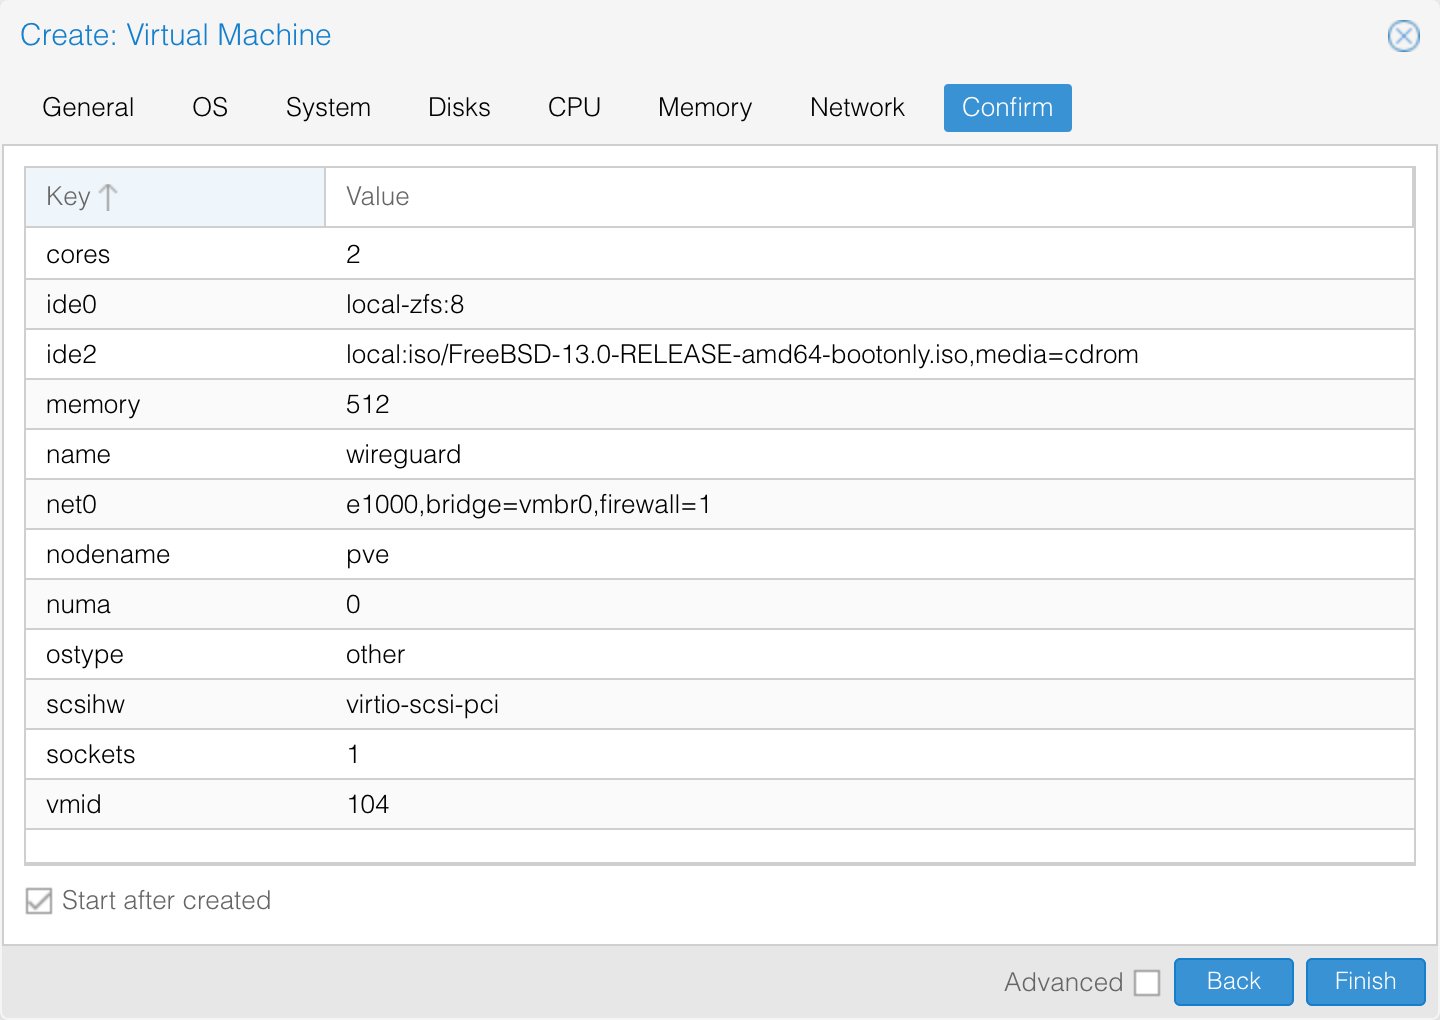
For starters, I have created a new VM using most of the default settings, assigned it an 8 GB Zvol disk for storage (since I’m using ZFS on PVE), 2 CPU cores and 512 MB of RAM.
I will follow a regular auto-UFS install, check local_unbound, sshd, ntpdate and ntpd for
starting at boot, check everything inside the security hardening options, no new users, exit. This
will take around 5 minutes on average.
After the installation is complete, we will first update the system using freebsd-update, bootstrap
pkg and install wireguard, and enable gateway & pf for IP forwarding and NAT.
root@wireguard:~ # freebsd-update fetch install
root@wireguard:~ # pkg bootstrap -y
root@wireguard:~ # pkg update
root@wireguard:~ # pkg upgrade -y
root@wireguard:~ # pkg install -y wireguard
One thing I also do is clear the motd template and restart the motd service since I don’t need extra output.
root@wireguard:~ # :>/etc/motd.template
root@wireguard:~ # service motd restart
Updating motd:.
This will take another 5 minutes on average depending on the number of updates that you will need, totalling to some 10 spent minutes until now.
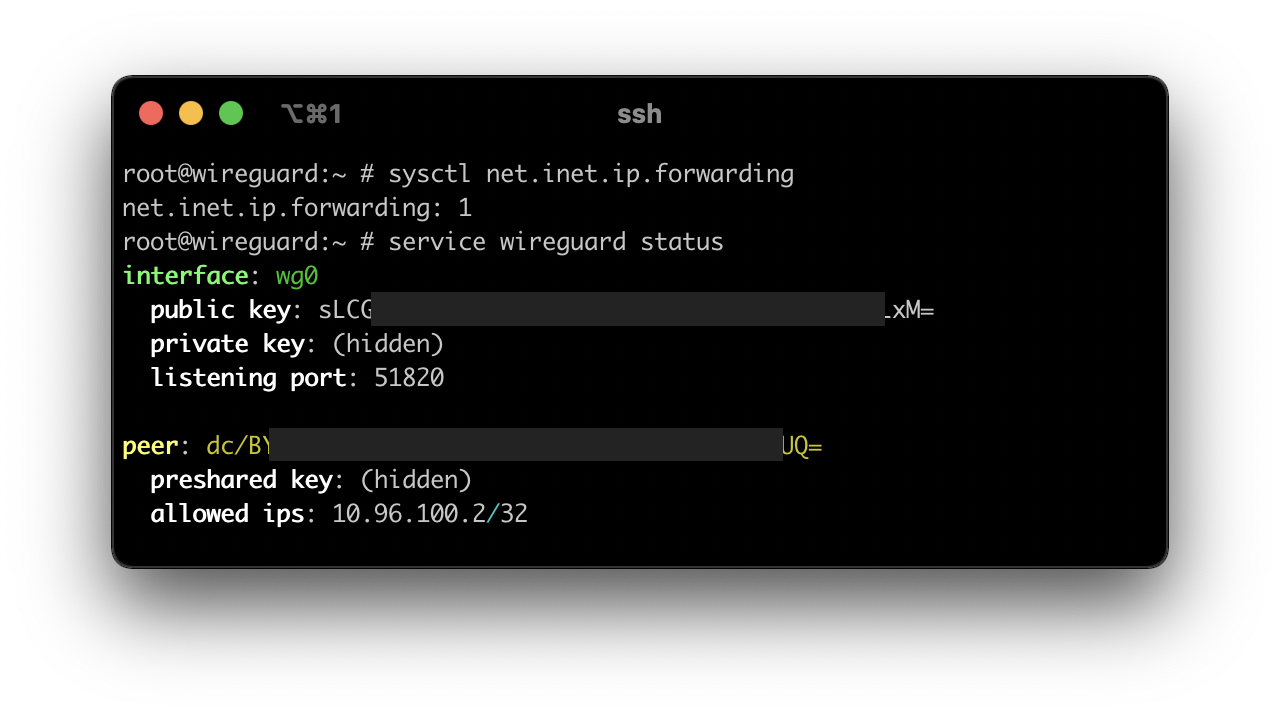
Now to enable wireguard and set its interface:
root@wireguard:~ # service wireguard enable
wireguard enabled in /etc/rc.conf
root@wireguard:~ # sysrc wireguard_interfaces="wg0"
wireguard_interfaces:  -> wg0
Enable IP forwarding and pf:
root@wireguard:~ # sysrc gateway_enable=YES
gateway_enable: NO -> YES
root@wireguard:~ # service pf enable
pf enabled in /etc/rc.conf
Set up NAT in /etc/pf.conf:
root@wireguard:~ # cat /etc/pf.conf
ext_if = "em0" # here's your external interface
wg_lan = "10.96.100.0/24" # your wireguard subnet

nat on $ext_if from $wg_lan to any -> ($ext_if)

root@wireguard:/usr/local/etc/wireguard # service pf start && pfctl -sn
Enabling pf.
nat on em0 inet from 10.96.100.0/24 to any -> (em0) round-robin
Now to set up WireGuard®, all we need to do is generate a private/public key pair for the server and
create the config for the wg0 interface, /usr/local/etc/wireguard/wg0.conf.
root@wireguard:~ # cd /usr/local/etc/wireguard/
root@wireguard:/usr/local/etc/wireguard # umask 077
root@wireguard:/usr/local/etc/wireguard # mkdir public private preshared
root@wireguard:/usr/local/etc/wireguard # wg genkey > private/server.key
root@wireguard:/usr/local/etc/wireguard # wg pubkey < private/server.key > public/server.key
We will do the same for out clients, generate a private and public key, but this time we will also generate a preshared key. Preshared keys for clients are optional security improvements and should be unique between clients.
root@wireguard:/usr/local/etc/wireguard # wg genkey > private/laptop.key
root@wireguard:/usr/local/etc/wireguard # wg pubkey < private/laptop.key > public/laptop.key
root@wireguard:/usr/local/etc/wireguard # wg genpsk > preshared/laptop.key
Now that we have our keys for the server and clients, let’s write the config.
root@wireguard:/usr/local/etc/wireguard # cat wg0.conf
[Interface]
Address = 10.96.100.1/32 # address the server will bind to
ListenPort = 51820 # listener port
PrivateKey = your-private-server-key-here

[Peer]
AllowedIPs = 10.96.100.2/32
PreSharedKey = your-preshared-client-key
PublicKey = your-public-client-key
Now that another 5 minutes passed (up to a total of 15 minutes), we will reboot the machine to set everything up, all services will be (re)started. Meanwhile we can set up port forwarding on the machine’s IP address, port 51820 UDP (or the port you chose earlier). Post reboot we’ll be greeted by everything working as it should.
Now for the client config (2 minutes I won’t take into account):
[Interface]
PrivateKey = your-private-client-key-here
Address = 10.96.100.2/32
DNS = 10.96.0.1 # optional, useful to avoid DNS leaks

[Peer]
PublicKey = your-public-server-key-here
PreSharedKey = your-preshared-client-key-here
AllowedIPs = 10.96.0.0/16 # my LAN
Endpoint = your-external-ip-or-host:51820
If you want to route all your traffic through the VPN server (a.k.a. use your server’s external IP
address), all you need to do is use 0.0.0.0/0 as your AllowedIPs.
Done.